
Please accomplish the following steps to complete your SSO setup using Jumpcloud.
As an administrator of your company’s JumpCloud account, go to the SSO page under USER AUTHENTICATION

Select “Custom SAML App”

Enter “DeleteMe SAML” in the Display Label field.
Uncheck “Show this application in User Portal” at the bottom of the page.

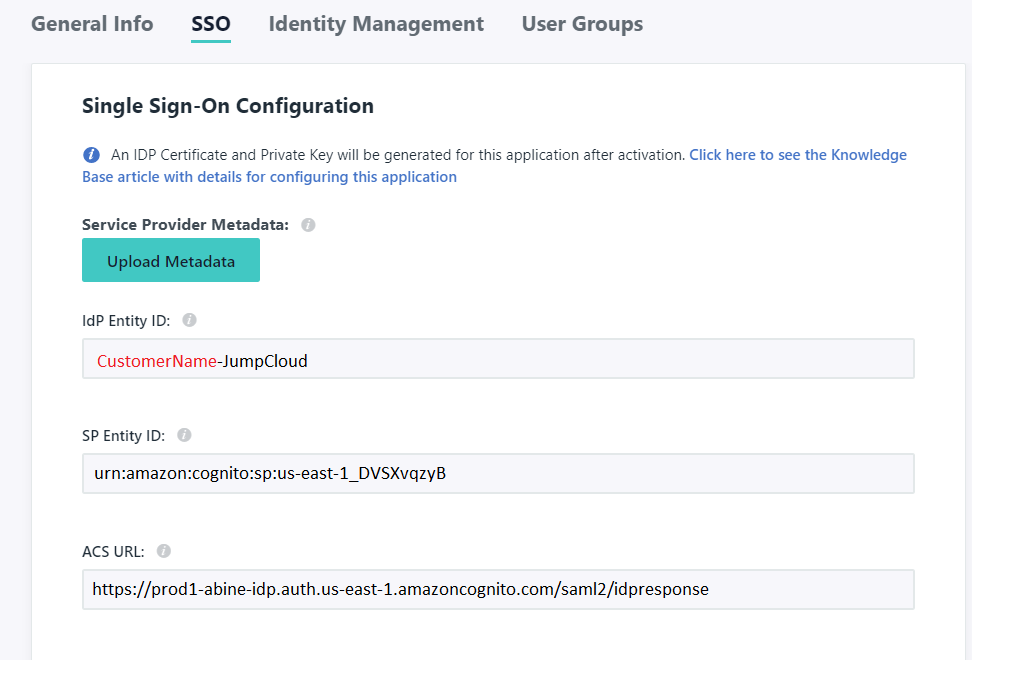
Next, click on the SSO tab.
In the Idp Entity ID field, enter CustomerName-JumpCloud, where CustomerName is replaced with the actual customer’s name. Only include alphanumeric characters.
In the SP Entity ID field, enter urn:amazon:cognito:sp:us-east-1_DVSXvqzyB
In the ACS URL field, enter https://prod1-abine-idp.auth.us-east-1.amazoncognito.com/saml2/idpresponse
In the SAMLSubject NameID field, select email.
In the SAMLSubject NameID Format field, select urn:oasis:names:tc:SAML:1.1:nameid-format:unspecified
Check the Sign Assertion checkbox
Check the Declare Redirect Endpoint checkbox
In the IDP URL field, enter delete_me at the end

Next, add the following User Attribute Mapping.
While the first three attributes are required, the last one is optional.
Including the country attribute will make it possible for the system to onboard members with memberships based on the country.
| Attribute Name | JumpCloud Attribute Name | Required |
| http://schemas.xmlsoap.org/ws/2005/05/identity/claims/emailaddress | Yes | |
| http://schemas.xmlsoap.org/ws/2005/05/identity/claims/givenname | firstname | Yes |
| http://schemas.xmlsoap.org/ws/2005/05/identity/claims/surname | lastname | Yes |
| http://schemas.xmlsoap.org/ws/2005/05/identity/claims/country | address.work.country | No |

Next, click the activate button in the bottom right corner.
Go back to the created application and click on the SSO tab, then click Export Metadata

In order to complete the SAML integration you will need to share the generated Metadata file with DeleteMe.
In order for members and administrators to access the system, two bookmark applications will also need to be created.
The bookmark applications can be added by clicking Add new Application, then URL Bookmark.

Under the General Info tab, enter “DeleteMe - Administration” for the Display Label field and ensure that the Show this application in User Portal checkbox is selected.

Next, go to the Bookmark tab and enter the following in the URL field:
https://prod1-abine-idp.auth.us-east-1.amazoncognito.com/oauth2/authorize?response_type=token&identity_provider=-xxxxxx&client_id=4o0tk02413hte9o62hcfog2dc9&redirect_uri=https://sso.joindeleteme.com/sso/&scope=email+openid+aws.cognito.signin.user.admin
Note, the xxxxxx needs to be replaced with the customer’s tenant name.

The same should be done to create a bookmark application for members, with two exceptions.
- The Display Label should be “DeleteMe - Members”
- The URL field should not include the “-” before the identity_provider name.
https://prod1-abine-idp.auth.us-east-1.amazoncognito.com/oauth2/authorize?response_type=token&identity_provider=xxxxxx&client_id=4o0tk02413hte9o62hcfog2dc9&redirect_uri=https://sso.joindeleteme.com/sso/&scope=email+openid+aws.cognito.signin.user.admin
Again, the xxxxxx needs to be replaced with the customer’s tenant name.
Once this is completed, ensure that appropriate user groups have access to the DeleteMe SAML application and the appropriate Bookmark application.
https://prod1-abine-idp.auth.us-east-1.amazoncognito.com/oauth2/authorize?response_type=token&identity_provider=-avalabs&client_id=4o0tk02413hte9o62hcfog2dc9&redirect_uri=https://sso.joindeleteme.com/sso/&scope=email+openid+aws.cognito.signin.user.admin
Comments
0 comments
Please sign in to leave a comment.